The procedure to assign an IPv6 address to an EC2 in AWS is amazingly complicated. In this guide, I walk you through all the hoops you have to jump through. Why would you want to add an IPv6 address to your EC2 instance? For me, it was a huge difference in internet connection speed. This tutorial can also be seen as a beginner's guide for AWS networking.
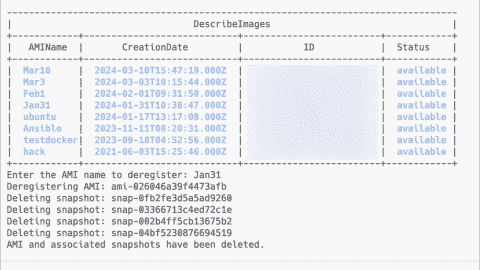
- Deregister an AMI and delete attached EBS snapshots in AWS with a script - Fri, May 3 2024
- Perplexity on 4sysops: New AI model with integrated online search - Wed, Apr 3 2024
- LLM reliability – New AI models on 4sysops - Mon, Mar 18 2024
IPv4 vs. IPv6 speed
For days, I noticed my connection to 4sysops was kind of slow at certain times of the day. Since there was no real load on the EC2 instance, I suspected that it could be a networking issue. When I accessed the site via a local IPv4 VPN server, speed was back to normal. At first, I thought the VPN connection took a faster route through the internet; then it occurred to me that my local provider works with IPv6, and this problem might be related.
Indeed, when I assigned an IPv6 address to an EC2 instance, the bandwidth with IPv6 to IPv6 was sometimes 100 times faster than with IPv6 to IPv4. It is hard to tell if my provider (Deutsche Telekom) caused the problem, if the IPv6 packets traveled through a faster route than the IPv4 packets, or if the problem might also be located in Amazon's clouds.
It is interesting to note that I noticed the same issue when I connected to an Amazon host (Washington) with speedtest.net. Using IPv4 on the client was always significantly faster than IPv6. However, when I chose another speetest.net host in the same region, I measured no bandwidth difference between IPv4 and IPv6. This is what I would expect. Theoretically, there should be no significant speed difference between the two protocols.
Anyway, it seems IPv6 has been picking up the pace in recent years, and I guess it makes sense now to work with a dual stack (IPv4 and IPv6) on public servers.

IPv6 adoption according to Google
AWS networking primer
If you think you only have to enable IPv6 for your EC2 instance, you will be surprised at how complicated it still is to assign an IPv6 address in AWS more than 20 years after the first IPv6 packets were wired through the internet. (I can't believe that I wrote an IPv6 tutorial almost 10 years ago and that I only just started to work with IPv6 recently.)
If you are a Windows admin, you are used to either just enabling DHCP in the network settings for your server or manually entering an IP address, and you are done. In AWS, things are a bit more complicated. This is the list of objects that have to be dealt with:
Virtual Private Cloud (VPC)—Think of a VPC as a virtual network that corresponds to a physical network (cables, switches, routers, etc.) The main components of a VPC are the subnet, the route table, and the internet gateway.
Subnet—A subnet is a logical division of an IP network. It essentially defines which IP addresses count as local and are therefore switched instead of being routed. You can house several subnets in your VPC.
Route Table—IP packets that need to be delivered to different subnets than the originating subnet (the internet, for instance) need to be routed. The route table is assigned to the VPC and determines the next destination for these packets.
Internet Gateway—This is the virtual router that will accept those packets with an external destination. The internet gateway is attached to the VPC.
Network Interface—Everything in the cloud is virtual, including network interfaces. Every EC2 instance has at least one network interface.
Security Group—This is Amazon's term for a network firewall. Here, you define which external TCP (and ICMP) packets are allowed to access your EC2 instance.
That's quite a list for such a simple task, isn't it?
Assigning the IPv6 address
I will assume here that you already have an EC2 instance with properly configured IPv4 settings. Notice that you have to follow the guide in the exact order as described below; otherwise, you will fail at some point.
If you want to launch a new instance with IPv6, you should be good to go after you read the guide below. You essentially have to create all the resources that I mentioned in the last paragraph in the VPC section of the AWS console.
- Launch the EC2 service in the AWS console and locate the EC2 instance where you want to add the IPv6 address. Click the VPC ID.

Locate the VPC of your EC2 instance
- Click the link under the VPC ID again and then click Edit CIDRs on the VPC page. Classless inter-domain routing (CIDR) is used to allocate our IPv6 network.

Edit CIDRs of the VPC
- On the next screen, click Add new IPv6 CIDR.

Add new IPv6 CIDR
- Select Amazon-provided IPv6 CIDR block and choose the AWS zone where your EC2 instance resides.

Add Amazon provided IPv6 CIDR
- Navigate to your VPC and click the route table.

Route table in the VPC
- Click the Routes tab and then Edit routes.

Edit routes
- You should already see a local IPv6 network here. We now have to add a route that ensures that external IPv6 traffic is routed to the internet gateway. Click Add route and then enter “::/0” under Destination. This stands for the default route in CIDR notation, and it means the route applies for all IPv6 traffic. For the target, choose Internet gateway. It is the same as for your IPv4 traffic.

Adding an IPv6 route
- Navigate to your VPC and click the subnet ID. On the Subnets page, click the ID again. Then click the Actions menu and select Edit IPv6 CIDRs.

Edit IPv6 CIDRs of the Subnet
- On the next page, click Add IPv6 CIDR and enter 00 in the field next to the IPv6 address. Don't forget to click Save.

Add IPv6 CIDR to the Subnet
- Navigate to your EC2 instance, click the Networking tab, and then click the network interface ID. On the Network interfaces page, click the ID again. In the Actions menu, you'll find the Manage IP addresses link.

Locate the network interface
- On the Manage IP addresses page, click the arrow next to the ID, and then in the IPv6 section, click Assign new IP address. Click Save.

Assign IPv6 address to the network interface
- If you reload the webpage in your browser, you should be able to see the IPv6 address that has been assigned to the network interface. Copy the IP address to your clipboard because we will need it later.

IPv6 address has been assigned to the network interface
- Navigate to your EC2 instance and click the Security tab and the ID of the attached security group.

Locate the security group of your EC2 instance
- Click Edit inbound rules on the Security Group

Edit inbound rules of the security group
- Now add the firewall rules that you want to use for your instance. In the source field, you can enter ://0 or just select Anywhere. In the latter case, the corresponding IPv4 rule will be added together with the IPv6 rule. In the example here, I allowed IPv4 for SSH, ICMP traffic for IPv6, and HTTP/HTTPS for IPv4 and IPv6.

Add rules to the security group


Wait a couple of seconds, open a terminal, and ping the IPv6 using the ping6 command (the ping command won't do, at least not on a Mac). Of course, this only works if your provider supports IPv6. You can check hereif you have an IPv6 address.

Pinging and IPv6 address
IPv6 DNS record
If your server responds, you can add the IPv6 address to your DNS server. IPv6 addresses require AAAA record whereas IPv4 addresses need A records. Likewise, if you query a DNS server with with nslookup you need to change the query type: set q=AAAA.

IPv6 query with nslookup
Elastic IP Address for IPv6?
You've probably noticed that assigning a public IPv6 address works differently in AWS than with IPv4 addresses. There are no elastic IPv6 addresses, which means that you can't reserve an IPv6 address in AWS. The reason is probably that Amazon can't charge for an IPv6 address because no shortage exists as for IPv4 addresses. That is, Amazon doesn't have to worry that their AWS customers start hoarding IPv6 addresses, which would be a problem with IPv4.
The downside is that once you terminate the EC2 instance, the IPv6 address is lost for you. This can be a problem if you want to move your application to a completely new instance and you don't want to go through the hassle of changing DNS records, which always causes outages.
However, if you keep the virtual machine and just reboot or stop the EC2 instance, the IPv6 address of your instance won't change.
By the way, another difference between elastic IPv4 addresses and public IPv6 addresses is that you can see the IP address in the guest OS. This allows you to verify that the IPv6 address has been assigned properly in case you have connection issues.
Subscribe to 4sysops newsletter!

IPv6 address assigned to the guest OS
Conclusion
Now you understand why DevOps is so popular in the cloud. That's lots of click-click for such a simple task. On the other hand, I guess it wouldn't be a big deal for Amazon to simply add an "Enable IPv6" option to the VPC settings, so that instead of 15 steps, just one click would do the trick. Of course, you don't have to repeat all the steps for every instance, assuming all your instances are in the same VPC.
IT Administration News
- OpenAI takes steps to boost AI-generated content transparency
- Apple unveils M4 chip with neural engine capable of 38 TOPS The Register
- Microsoft confirms Windows 11 24H2 turns on Device Encryption by default
- Windows Insiders to fly solo while Copilot rollout frozen
- OpenAI strikes licensing deal with the magazine giant behind People – The Verge
Join our IT community and read articles without ads!
Do you want to write for 4sysops? We are looking for new authors.


Thanks a lot.
I have spent some time in the EC2 console, but still needed your help. Some little things have changed, and I have a lot more instances, but jumping around your instructions, going out of order, being in a hurry, but IT WORKS !!! – In my case the range I got from Amazon assigned block was super valuable. Ended up using 7 different addresses within the same sub.
After suffering through AWS’s limited documentation on this process for hours, I found your site and realized which steps (STEP 11 was the key for me) I was missing to set up IPv6 on my AWS instances. I don’t know why AWS doesn’t have a more useful walkthrough like yours…Thanks a million!
Thanks! Yeah, they changed some things. I think I saw that in the the Console you can now add an IPv6 address when you launch a new instance. I am unsure if this means that you no longer have to jump through all the hoops I described in the article.
excellent write up, thank you. been trying to get this working today, and your article had me up and running in 10 minutes.
Thank you, Micheal. It is helpful. My domain is not working although I registered all DNS and IP addresses. Do you have any idea in terms how to fix it?
Use nslookup to see if DNS is configured properly.
Use ping6 to see if your server responds to IPv6.
Really, really, really thank you, this saved hours and hours and then giving up in frustration.
One useful enhancement – when you click the Interface ID again, then Actions, Manage IP addresses, open the interface, then in the IPv6 section, click Assign new IP address, there is a new checkbox “Assign primary IPv6 IP”.
My impression from the docs is that this associates the IPv6 address permanently, like an elastic IP.
(But I daren’t reboot to test!)
That was grueling. Highly questionable of AWS to put existing, locked in customers through that to avoid the new charge. Hopefully they’ll make it easier before the IPv4 charge starts in Feb 2024.
Thank you from the bottom of my heart.
I think the guide is a bit outdated. Assigning an IPv6 address has become easier, but there is no IPv6 counterpart for elastic addresses. Elastic addresses do not have an IPv6 equivalent, and the reason behind this is unclear to me.
I misunderstood the docs on the new “Assign primary IPv6 IP” checkbox.
I couldn’t find any other start to finish guide. The AWS guide made no sense to me until after I’d stepped through your more detailed tutorial here to understand how the parts fit together. Much thanks.
AWS pages have significantly changed, you might want to walk through your walk-through. In particular, there was a critical step which has been added. We probably lost 20-30 hours on this one: Under “Manage IP addresses”, when you “Assign new IPv6 Address”, you MUST check “Assign primary IPv6 IP”, or the supervisory IPv6 address will be retained in the DHCP server as the address for the MAC.
Of course, you can log in to your instance (on IPv4), and run
, if you like to make work for yourself.
I have an EC2 instance that works on IPv6 without any primary IPv6 address being assigned. I believe that the primary IPv6 address serves the sole purpose of ensuring that it can never be removed from the instance and can be used as a unique identifier. The IP address is only released if the instance is terminated.
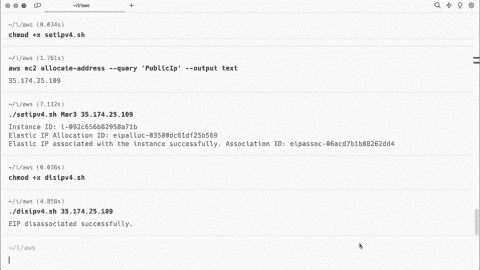
If you’re struggling to assign an IPv6 address to an EC2 instance, consider using my script. It ensures all necessary components are correctly configured.