


文章目录
前言
型号:树莓派4B
环境:Python3.7
远程控制软件:VNC Viewer(远程控制时,需要保证都处于同一个局域网中)
1、部署过程
1.1、下载YOLOv5
- 先去YOLOv5官网下载文件代码,然后在树莓派新建一个YOLOv5文件夹并把下载好的文件传输到里面
- 这里采用YOLOv5-6.0

3.然后安装依赖:
sudo apt-get install libopenblas-dev libblas-dev m4 cmake cython python3-dev python3-yaml python3-setuptools python3-wheel python3-pillow python3-numpy
1.2、安装opencv、pytorch和numpy
1.2.1、安装opencv
sudo apt-get install python3-opencv
建议是否安装成功:

1.2.2、安装pytorch&numpy
首先查看Python版本对应哪个Torch版本和torchvision版本

找到对应的torch和torchvision版本后,下载到树莓派中并安装
# 这里采用torch1.6.0的版本依旧能运行,所以也不一定得按版本对照来,不过能按照版本来就按照版本来
pip3 install torch-1.6.0a0+b31f58d-cp37-cp37m-linux_armv7l.whl

pip3 install torchvision-0.8.0a0+10d5a55-cp37-cp37m-linux_armv7l.whl

pip3 install numpy==1.18.5 -i https://mirrors.aliyun.com/pypi/simple/
1.3、YOLOv5安装
去到YOLOv5项目,找到requirements.txt把 numpy、opencv-python、torch和torchvision注释

cd /home/pi/yolov5-waste  #那个pi是我的用户名,注意要填自己的用户名
sudo nano requirements.txt
# 按ctrl+o并回车完成写入,按ctrl+x退出。

# YOLOv5其他环境一键安装
pip3 install -r requirements.txt -i https://mirrors.aliyun.com/pypi/simple/
安装完成图

1.4、运行detect.py
cd /home/pi/yolov5-waste  #那个pi是我的用户名,注意要填自己的用户名
# 确保根目录有yolov5s.pt
python3 detect.py    # 成功检测!
2、开机自动运行脚本
【方法一】
1、在终端上输入:
sudo vi /etc/rc.local
2、就会出现一个文本编辑器,在文本内容的exit 0 上面添加一行:
python3 /home/pi/picam.py
3、然后保存更改, 重启树莓派:
# 重启树莓派方式1:
sudo reboot
# 重启树莓派方式2:
sudo shutdown -r now
【方法二】
1、进入/home/pi/.config 路径
cd /home/pi/.config
2、 找到autostart 路径,没有就创建一个
mkdir autostart
3、然后进入autostart 路径
cd autostart
4、 在autostart 中创建一个.desktop 尾缀文件,例如test.desktop
touch test.desktop
5、 该文件中输入:
[Desktop Entry]
Name=controller
Comment=controller Program
Encoding=UTF-8
Exec=lxterminal -e bash -c 'python3 /home/pi/yolov5-waste/images_detect.py;$SHELL'
Terminal=false
MultipleArgs=false
Type=Application
Categories=Application;Development;
StartupNotify=true
其中,Name、Comment、Exec、Icon 分别代表启动项的名称、备注、图标(随便找个png图片)、Exec表示调用的指令,相当于在shell终端执行的指令.,例如sudo python3 /home/pi/yolov5-waste/images_detect.py
6、 最后重启即可观察到该程序自启了。
3、遇到的问题
3.1、pip3下载缓慢
如果你没有换成国内源话,下载速度有时候会很慢,甚至直接报错 Read timed out
解决办法: 使用国内源去下载
3.1.1、国内源
- 阿里云:
https://mirrors.aliyun.com/pypi/simple/ - 清华:
https://pypi.tuna.tsinghua.edu.cn/simple - 中国科技大学
https://pypi.mirrors.ustc.edu.cn/simple/ - 华中理工大学:
https://pypi.hustunique.com/ - 山东理工大学:
https://pypi.sdutlinux.org/ - 豆瓣:
https://pypi.douban.com/simple/
3.1.2、单次使用
- pip install -r requirements.txt -i https://mirrors.aliyun.com/pypi/simple/
- pip install 单个包名 -i https://mirrors.aliyun.com/pypi/simple/
3.1.3、永久修改
设置
$ pip3 config set global.index-url http://mirrors.aliyun.com/pypi/simple/
Writing to /root/.config/pip/pip.conf

$ pip3 config set install.trusted-host mirrors.aliyun.com
Writing to /root/.config/pip/pip.conf
查看效果
$ cat /root/.config/pip/pip.conf
[global]
index-url = http://mirrors.aliyun.com/pypi/simple/

[install]
trusted-host = mirrors.aliyun.com

$ pip config list
global.index-url='http://mirrors.aliyun.com/pypi/simple/'
install.trusted-host='mirrors.aliyun.com'
删除设置
pip config unset global.index-url

Writing to /root/.config/pip/pip.conf

cat /root/.config/pip/pip.conf

[install]
trusted-host = mirrors.aliyun.com
3.2、手动安装whl文件失败
将下载好的Twisted-18.4.0-cp36-cp36m-win_amd64.whl放在E盘下面
包名中间的cp36是python3.6的意思,amd64是python的位数。
在安装python的whl包时,出现了以下问题:

解决办法: 查看当前环境支持包的类型
# 进入python,输入以下代码,查看pip支持的类型
import pip._internal
print(pip._internal.pep425tags.get_supported())
运行结果:
[('cp38', 'cp38m', 'win32'), ('cp38', 'none', 'win32'), ('py3', 'none', 'win32'), ('cp38', 'none', 'any'), ('cp3', 'none', 'any'), ('py38', 'none', 'any'), ('py3', 'none', 'any'), ('py37', 'none', 'any'), ('py36', 'none', 'any'), ('py35', 'none', 'any'), ('py34', 'none', 'any'), ('py33', 'none', 'any'), ('py32', 'none', 'any'), ('py31', 'none', 'any'), ('py30', 'none', 'any')]
可以看到,我们下载的whl包,命名不符合python3.8.0的安装支持,按照(‘cp38’, ‘cp38m’, ‘win32’),将其命名为:Twisted-20.3.0-cp38-cp38m-win32.whl 即可。
3.3、树莓派无法检测到摄像头
3.3.1、判断是否正确加载摄像头
方式1:检测摄像头
vcgencmd get_camera
 # 输出supported=1 说明支持外设摄像头
# supported=1 detected=0.
方式2:检测video设备
ls /dev/video*
#正确连接时,第一个设备会是video0
#/dev/video0  /dev/video1  /dev/video10  /dev/video11  /dev/video12

3.3.2、开启摄像头
方法一: 系统开启摄像头
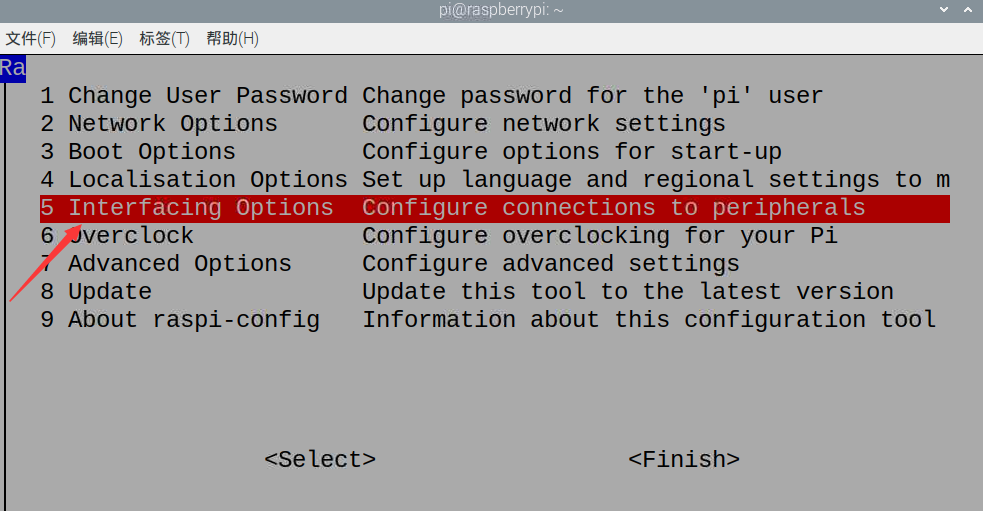
sudo raspi-config
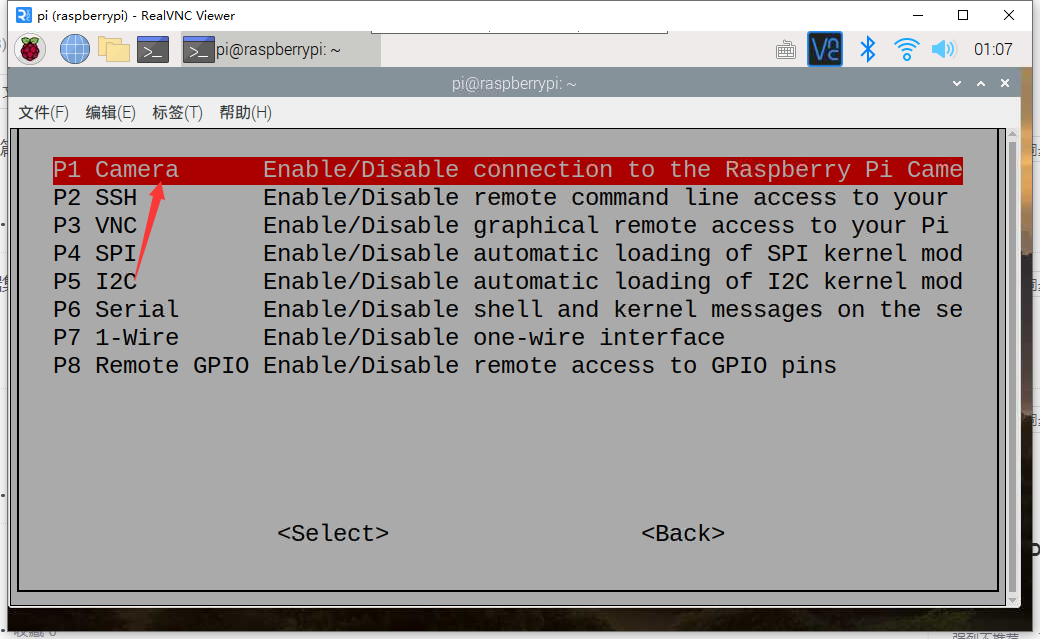
将光标移动到摄像头选项( Interface Options)处,并选择启用(Enable)。
将光标移动到摄像头选项(Camera option)处,并选择启用(Enable)。在退出 raspi-config 时会要求您重新启动。启用选项是为了确保重启后 GPU 固件能够正确运行(包括摄像头驱动和调节电路),并且 GPU 从主内存划分到了足够的内存使摄像头能够正确运行。
方法二: 加载摄像头驱动
sudo nano /etc/modules  # 在编写的文件后面加上 bcm2835-v4l2
# 按ctrl+o并回车完成写入,按ctrl+x退出。


 1553
1553


 被折叠的 条评论
为什么被折叠?
被折叠的 条评论
为什么被折叠?
 到【灌水乐园】发言


