Examples
Thumbnails.of(new File("original.jpg"))
        .size(160, 160)
        .toFile(new File("thumbnail.jpg"));
In this example, the image from original.jpg is resized, and then saved to thumbnail.jpg.
Alternatively, Thumbnailator will accept file names as a String. Using File objects to
specify image files is not required:
Thumbnails.of("original.jpg")
        .size(160, 160)
        .toFile("thumbnail.jpg");
This form can be useful when writing quick prototype code, or when Thumbnailator is being used from scripting languages.
Thumbnails.of(new File("original.jpg"))
        .size(160, 160)
        .rotate(90)
        .watermark(Positions.BOTTOM_RIGHT, ImageIO.read(new File("watermark.png")), 0.5f)
        .outputQuality(0.8)
        .toFile(new File("image-with-watermark.jpg"));
In this example, the image from original.jpg is resized, then rotated to clockwise by 90 degrees,
then a watermark is placed at the bottom right-hand corner which is half transparent,
then is saved to image-with-watermark.jpg with 80% compression quality settings.
OutputStream os = ...;

Thumbnails.of("large-picture.jpg")
        .size(200, 200)
        .outputFormat("png")
        .toOutputStream(os);
In this example, an image from the file large-picture.jpg is resized to a maximum dimension
of 200 x 200 (maintaining the aspect ratio of the original image) and writes the that to the
specified OutputStream as a PNG image.
BufferedImage originalImage = ImageIO.read(new File("original.png"));

BufferedImage thumbnail = Thumbnails.of(originalImage)
        .size(200, 200)
        .asBufferedImage();
The above code takes an image in originalImage and creates a thumbnail to fit in 200 pixel by 200 pixel dimensions and stores the result in thumbnail.
NOTE: Using this approach, the thumbnail will not necessarily be 200 pixel by 200 pixel dimensions. If the source image is not the same aspect ratio as the thumbnail, the thumbnail will be smaller than 200 pixel by 200 pixel. For example, if the source image is 300 x 400, the resulting thumbnail will be 150 x 200.
BufferedImage originalImage = ImageIO.read(new File("original.png"));

BufferedImage thumbnail = Thumbnails.of(originalImage)
        .size(200, 200)
        .keepAspectRatio(false)
        .asBufferedImage();
or
BufferedImage originalImage = ImageIO.read(new File("original.png"));

BufferedImage thumbnail = Thumbnails.of(originalImage)
        .forceSize(200, 200)
        .asBufferedImage();
The two examples takes an image in originalImage and creates a 200 pixel by 200 pixel thumbnail using and stores the result in thumbnail.
NOTE:
The example in the previous section will not necessarily create a thumbnail with the specified size.
To ensure that the thumbnail will be the specified dimension, use .keepAspectRatio(false) or forceSize as shown in this section.
While these options will always produce thumbnails with the specified size, the aspect ratio is not preserved.
This means that the thumbnail could end up looking squashed or stretched.
BufferedImage originalImage = ImageIO.read(new File("original.png"));

BufferedImage thumbnail = Thumbnails.of(originalImage)
        .scale(0.25)
        .asBufferedImage();
The above code takes the image in originalImage and creates a thumbnail that is 25% of the original image, and uses the default scaling technique in order to make the thumbnail which is stored in thumbnail.
BufferedImage originalImage = ImageIO.read(new File("original.jpg"));

BufferedImage thumbnail = Thumbnails.of(originalImage)
        .size(200, 200)
        .rotate(90)
        .asBufferedImage();
The above code takes the original image and creates a thumbnail which is rotated clockwise by 90 degrees.
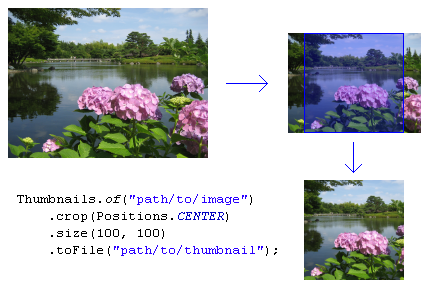
Thumbnails.of("path/to/image")
        .crop(Positions.CENTER)
        .size(100, 100)
        .toFile("path/to/thumbnail");
The above code makes a thumbnail that maintains the aspect ratio of the original image.
Part of the image that goes outside the bounds specified in the size method is cropped.
For example, resizing the image from 240x200 to 100x100 using the above code results in the following:
Where the image is cropped is determined by the Position parameter given to the crop method.
For details, refer to the documentation of the crop(Position) method.
BufferedImage originalImage = ImageIO.read(new File("original.jpg"));
BufferedImage watermarkImage = ImageIO.read(new File("watermark.png"));

BufferedImage thumbnail = Thumbnails.of(originalImage)
        .size(200, 200)
        .watermark(Positions.BOTTOM_RIGHT, watermarkImage, 0.5f)
        .asBufferedImage();
As shown, a watermark can be added to an thumbnail by calling the watermark method.
The positioning can be selected from the Positions enum.
The opaqueness (or conversely, transparency) of the thumbnail can be adjusted by changing the last argument, where 0.0f being the thumbnail is completely transparent, and 1.0f being the watermark is completely opaque.
File destinationDir = new File("path/to/output");

Thumbnails.of("apple.jpg", "banana.jpg", "cherry.jpg")
        .size(200, 200)
        .toFiles(destinationDir, Rename.PREFIX_DOT_THUMBNAIL);
This example will take the source images, and write the thumbnails them as files to destinationDir (path/to/output directory) while renaming them with thumbnail. prepended to the file names.
Therefore, the thumbnails will be written as files in:
path/to/output/thumbnail.apple.jpgpath/to/output/thumbnail.banana.jpgpath/to/output/thumbnail.cherry.jpg
It's also possible to preserve the original filename while writing to a specified directory:
File destinationDir = new File("path/to/output");

Thumbnails.of("apple.jpg", "banana.jpg", "cherry.jpg")
        .size(200, 200)
        .toFiles(destinationDir, Rename.NO_CHANGE);
In the above code, the thumbnails will be written to:
path/to/output/apple.jpgpath/to/output/banana.jpgpath/to/output/cherry.jpg
Since: Thumbnailator 0.4.7