MQ 的产生背景
系统之间直接调用存在的问题?
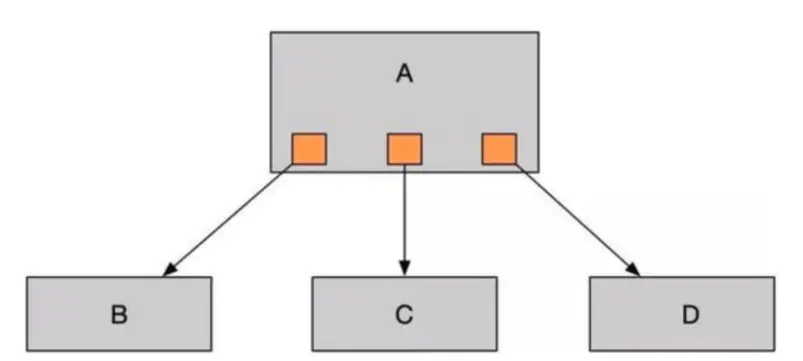
微服务架构后,链式调用是我们在写程序时候的一般流程,为了完成一个整体功能会将其拆分成多个函数(或子模块),比如模块 A 调用模块 B,模块 B 调用模块 C,模块 C 调用模块 D。但在大型分布式应用中,系统间的 RPC 交互繁杂,一个功能背后要调用上百个接口并非不可能,从单机架构过渡到分布式微服务架构的通例。这些架构会有哪些问题?
- 系统之间接口耦合比较严重
每新增一个下游功能,都要对上游的相关接口进行改造;
举个例子:如果系统 A 要发送数据给系统 B 和系统 C,发送给每个系统的数据可能有差异,因此系统 A 对要发送给每个系统的数据进行了组装,然后逐一发送;
当代码上线后又新增了一个需求:把数据也发送给 D,新上了一个 D 系统也要接受 A 系统的数据,此时就需要修改 A 系统,让他感知到 D 系统的存在,同时把数据处理好再给 D。在这个过程你会看到,每接入一个下游系统,都要对系统 A 进行代码改造,开发联调的效率很低。其整体架构如下图:
- 面对大流量并发时,容易被冲垮
每个接口模块的吞吐能力是有限的,这个上限能力如果是堤坝,当大流量(洪水)来临时,容易被冲垮。举个例子秒杀业务:上游系统发起下单购买操作,就是下单一个操作,很快就完成。然而,下游系统要完成秒杀业务后面的所有逻辑(读取订单,库存检查,库存冻结,余额检查,余额冻结,订单生产,余额扣减,库存减少,生成流水,余额解冻,库存解冻)。
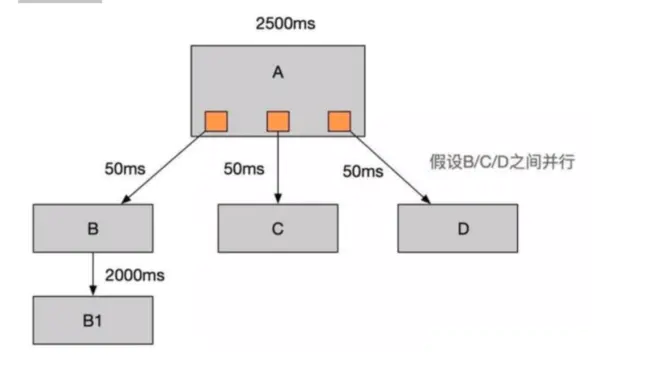
- 等待同步存在性能问题
RPC 接口上基本都是同步调用,整体的服务性能遵循“木桶理论”,即整体系统的耗时取决于链路中最慢的那个接口。比如 A 调用 B/C/D 都是 50ms,但此时 B 又调用了 B1,花费 2000ms,那么直接就拖累了整个服务性能
根据上述的几个问题,在设计系统时可以明确要达到的目标:
1,要做到系统解耦,当新的模块接进来时,可以做到代码改动最小;能够解耦
2,设置流量缓冲池,可以让后端系统按照自身吞吐能力进行消费,不被冲垮;能削峰
3,强弱依赖梳理能将非关键调用链路的操作异步化并提升整体系统的吞吐能力;能够异步
MQ 的主要作用
(1) 异步。调用者无需等待。
(2) 解耦。解决了系统之间耦合调用的问题。
(3) 消峰。抵御洪峰流量,保护了主业务。
springboot 整合 demo
<?xml version="1.0" encoding="UTF-8"?>
<project xmlns="http://maven.apache.org/POM/4.0.0" xmlns:xsi="http://www.w3.org/2001/XMLSchema-instance"
   xsi:schemaLocation="http://maven.apache.org/POM/4.0.0 http://maven.apache.org/xsd/maven-4.0.0.xsd">
   <modelVersion>4.0.0</modelVersion>
   <parent>
      <groupId>org.springframework.boot</groupId>
      <artifactId>spring-boot-starter-parent</artifactId>
      <version>2.1.5.RELEASE</version>
      <relativePath/> <!-- lookup parent from repository -->
   </parent>
   <groupId>com.at.boot.activemq</groupId>
   <artifactId>boot_mq_produce</artifactId>
   <version>1.0-SNAPSHOT</version>


   <properties>
      <project.build.sourceEncoding>UTF-8</project.build.sourceEncoding>
      <maven.compiler.source>1.8</maven.compiler.source>
      <maven.compiler.target>1.8</maven.compiler.target>
   </properties>

   <dependencies>
      <dependency>
         <groupId>org.springframework.boot</groupId>
         <artifactId>spring-boot-starter-test</artifactId>
         <scope>test</scope>
      </dependency>
      <dependency>
         <groupId>org.springframework.boot</groupId>
         <artifactId>spring-boot-starter-web</artifactId>
      </dependency>

      <dependency>
         <groupId>org.springframework.boot</groupId>
         <artifactId>spring-boot-starter</artifactId>
      </dependency>
      <!--spring boot整合activemq的jar包-->
      <dependency>
         <groupId>org.springframework.boot</groupId>
         <artifactId>spring-boot-starter-activemq</artifactId>
         <version>2.1.5.RELEASE</version>
      </dependency>
   </dependencies>

   <build>
      <plugins>
         <plugin>
            <groupId>org.springframework.boot</groupId>
            <artifactId>spring-boot-maven-plugin</artifactId>
         </plugin>
      </plugins>
   </build>
</project>
- application.yml
# web占用的端口
server:
  port: 7777

spring:
  activemq:
    # activemq的broker的url
    broker-url: tcp://192.168.17.3:61616
    # 连接activemq的broker所需的账号和密码
    user: admin
    password: admin
  jms:
    # 目的地是queue还是topic, false(默认) = queue    true =  topic
    pub-sub-domain: false

#  自定义队列名称。这只是个常量
myqueue: boot-activemq-queue
- 配置目的地的 bean
import org.apache.activemq.command.ActiveMQQueue;
import org.springframework.beans.factory.annotation.Value;
import org.springframework.context.annotation.Bean;
import org.springframework.jms.annotation.EnableJms;
import org.springframework.stereotype.Component;

// 让spring管理的注解,相当于spring中在xml 中写了个bean
@Component
// 开启jms适配
@EnableJms
public class ConfigBean {

        // 注入配置文件中的 myqueue
        @Value("${myqueue}")
        private String myQueue ;

        @Bean   // bean id=""  class="…"
        public ActiveMQQueue queue(){
             return  new ActiveMQQueue(myQueue);
        }
}
- queue 队列生产者代码
package com.at.boot.activemq.produce;

import org.springframework.beans.factory.annotation.Autowired;
import org.springframework.jms.core.JmsMessagingTemplate;
import org.springframework.scheduling.annotation.Scheduled;
import org.springframework.stereotype.Component;
import javax.jms.Queue;
import java.util.UUID;

@Component
public class Queue_Produce {

    // JMS模板
    @Autowired
    private JmsMessagingTemplate  jmsMessagingTemplate ;

    // 这个是我们配置的队列目的地
    @Autowired
    private Queue queue ;

    // 发送消息
    public void produceMessage(){
        // 一参是目的地,二参是消息的内容
        jmsMessagingTemplate.convertAndSend(queue,"****"+ UUID.randomUUID().toString().substring(0,6));
    }

    // 定时任务。每3秒执行一次。非必须代码,仅为演示。
    @Scheduled(fixedDelay = 3000)
    public void produceMessageScheduled(){
        produceMessage();
    }
}
- 主启动类(非必须,仅为演示)
package com.at.boot.activemq;

import org.springframework.boot.SpringApplication;
import org.springframework.boot.autoconfigure.SpringBootApplication;
import org.springframework.scheduling.annotation.EnableScheduling;

@SpringBootApplication
// 是否开启定时任务调度功能
@EnableScheduling
public class MainApp_Produce {
    public static void main(String[] args) {
        SpringApplication.run(MainApp_Produce.class,args);
    }
}
- 单元测试(非必须,仅为演示)
package com.at.boot.activemq;

import com.at.boot.activemq.produce.Queue_Produce;
import org.junit.Test;
import org.junit.runner.RunWith;
import org.springframework.boot.test.context.SpringBootTest;
import org.springframework.test.context.junit4.SpringJUnit4ClassRunner;
import org.springframework.test.context.web.WebAppConfiguration;
import javax.annotation.Resource;

// 加载主类
@SpringBootTest(classes = MainApp_Produce.class)
// 加载spring的junit
@RunWith(SpringJUnit4ClassRunner.class)
// 加载web
@WebAppConfiguration
public class TestActiveMQ {

    @Resource    //  这个是java 的注解,而Autowried 是 spring 的
    private Queue_Produce  queue_produce ;

//  这个是java 的注解,而Autowried 是 spring 的
    @Test
    public  void testSend() throws Exception{
        queue_produce.produceMessage();
    }
}
- queue 消费者
package com.at.boot.activemq.consummer;

import org.springframework.jms.annotation.JmsListener;
import org.springframework.stereotype.Component;
import javax.jms.TextMessage;

@Component
public class Queue_consummer {

    // 注册一个监听器。destination指定监听的主题。
    @JmsListener(destination = "${myqueue}")
    public void receive(TextMessage textMessage) throws  Exception{
        System.out.println(" ***  消费者收到消息  ***"+textMessage.getText());
    }
}
- application.yml
server:
  port: 6666
spring:
  activemq:
    broker-url: tcp://192.168.17.3:61616
    user: admin
    password: admin
  jms:
    # 目的地是queue还是topic, false(默认) = queue    true =  topic
    pub-sub-domain: true

 #  自定义主题名称
mytopic: boot-activemq-topi
- 配置目的地的 bean 和开启 JMS 功能
package com.at.boot.activemq.topic.config;

import org.apache.activemq.command.ActiveMQTopic;
import org.springframework.beans.factory.annotation.Value;
import org.springframework.context.annotation.Bean;
import org.springframework.jms.annotation.EnableJms;
import org.springframework.stereotype.Component;
import javax.jms.Topic;

@Component
@EnableJms
public class ConfigBean {

    @Value("${mytopic}")
    private String  topicName ;

    @Bean
    public Topic topic() {
        return new ActiveMQTopic(topicName);
    }
}
- Topic 生产者代码
package com.at.boot.activemq.topic.produce;

import org.springframework.beans.factory.annotation.Autowired;
import org.springframework.jms.core.JmsMessagingTemplate;
import org.springframework.scheduling.annotation.Scheduled;
import org.springframework.stereotype.Component;
import javax.jms.Topic;
import java.util.UUID;

@Component
public class Topic_Produce {

    @Autowired
    private JmsMessagingTemplate  jmsMessagingTemplate ;

    @Autowired
    private Topic  topic ;

    @Scheduled(fixedDelay = 3000)
    public void produceTopic(){
        jmsMessagingTemplate.convertAndSend(topic,"主题消息"+ UUID.randomUUID().toString().substring(0,6));
    }
}
- Topic 消费者代码
package com.at.boot.activemq.consummer;

import org.springframework.jms.annotation.JmsListener;
import org.springframework.stereotype.Component;
import javax.jms.TextMessage;

@Component
public class Topic_Consummer {

    @JmsListener(destination = "${mytopic}")
    public void receive(TextMessage textMessage) throws  Exception{
        System.out.println("消费者受到订阅的主题:"+textMessage.getText());
    }
}
欢迎来到这里!
我们正在构建一个小众社区,大家在这里相互信任,以平等 • 自由 • 奔放的价值观进行分享交流。最终,希望大家能够找到与自己志同道合的伙伴,共同成长。
注册 关于